Running Jupyter/Python on a Raspberry Pi Zero with a Pimoroni Enviro-pHAT sensor add-on attached
Hardware assembly | PiFactory and serial cable use | Rest of full setup for EnviroPHAT use | Jupyter notebook lowdown | Conclusion & links

Introduction

EnviroPHATThe tiny version of the Raspberry Pi computer, the Pi Zero, is not much larger than a stick of gum yet is a full Linux-based computer (oh, and by the way it's only $5!). It's a bit less powerful than the larger Pi 2 & 3 models, but it uses much less power than they do allowing realistic battery implementation, while still being able to use the same "Hat" add-ons. So it's a potentially nice field sensor platform for some applications - and really quick and easy to get up and going. Here I experiment with a simple canned sensor HAT made by Pimoroni, the "Enviro pHAT", and running a Jupyter server on the Pi Zero to analyze/view the sensor data in a web-based Python notebook.

I bought these parts from Adafruit.com, a key business in these products. But note that wherever you buy them from, the Raspberry Pi company that makes these things is still small and not well-outfitted for mass production of this very popular computer, and stores still have a "you can only by one at a time" rule, which is kindof a pain. In a practical sense this means that instead of a $5 computer it ends up a $15 one, assuming you want to buy more than one (which you should since mistakes like putting jumpers/wires on the wrong pins can easily blow the thing out), because you buy one from each of several stores and add on a $10 or so shipping charge. In an even more practical sense, while the R-Pi0's are just $5 (or $15), note you'll need a handful of supporting gear to connect and use it. Often blogs talk of using HDMI cables to hook up to monitors, little USB hubs to hook up to keyboard and mouse, and an AC adapter to power from a wall plug, but you really don't need all that. You can easily get away with just the following, among which even the last two (batter and charger) are optional:Those last two are optional because as we'll see, that USB to TTL serial cable powers the R-Pi as well as connects it to a terminal window on your computer. But if you want, after you've used it to config things, you could remove the cable and use the battery and just log in remotely via wifi. In any case, again I do recommend buying several Pi Zeroes to start, just in case you blow a few. Some other stores to buy them from include Pimoroni, Canakit, and The Pi Hut.


Hardware assembly

rpi_solo
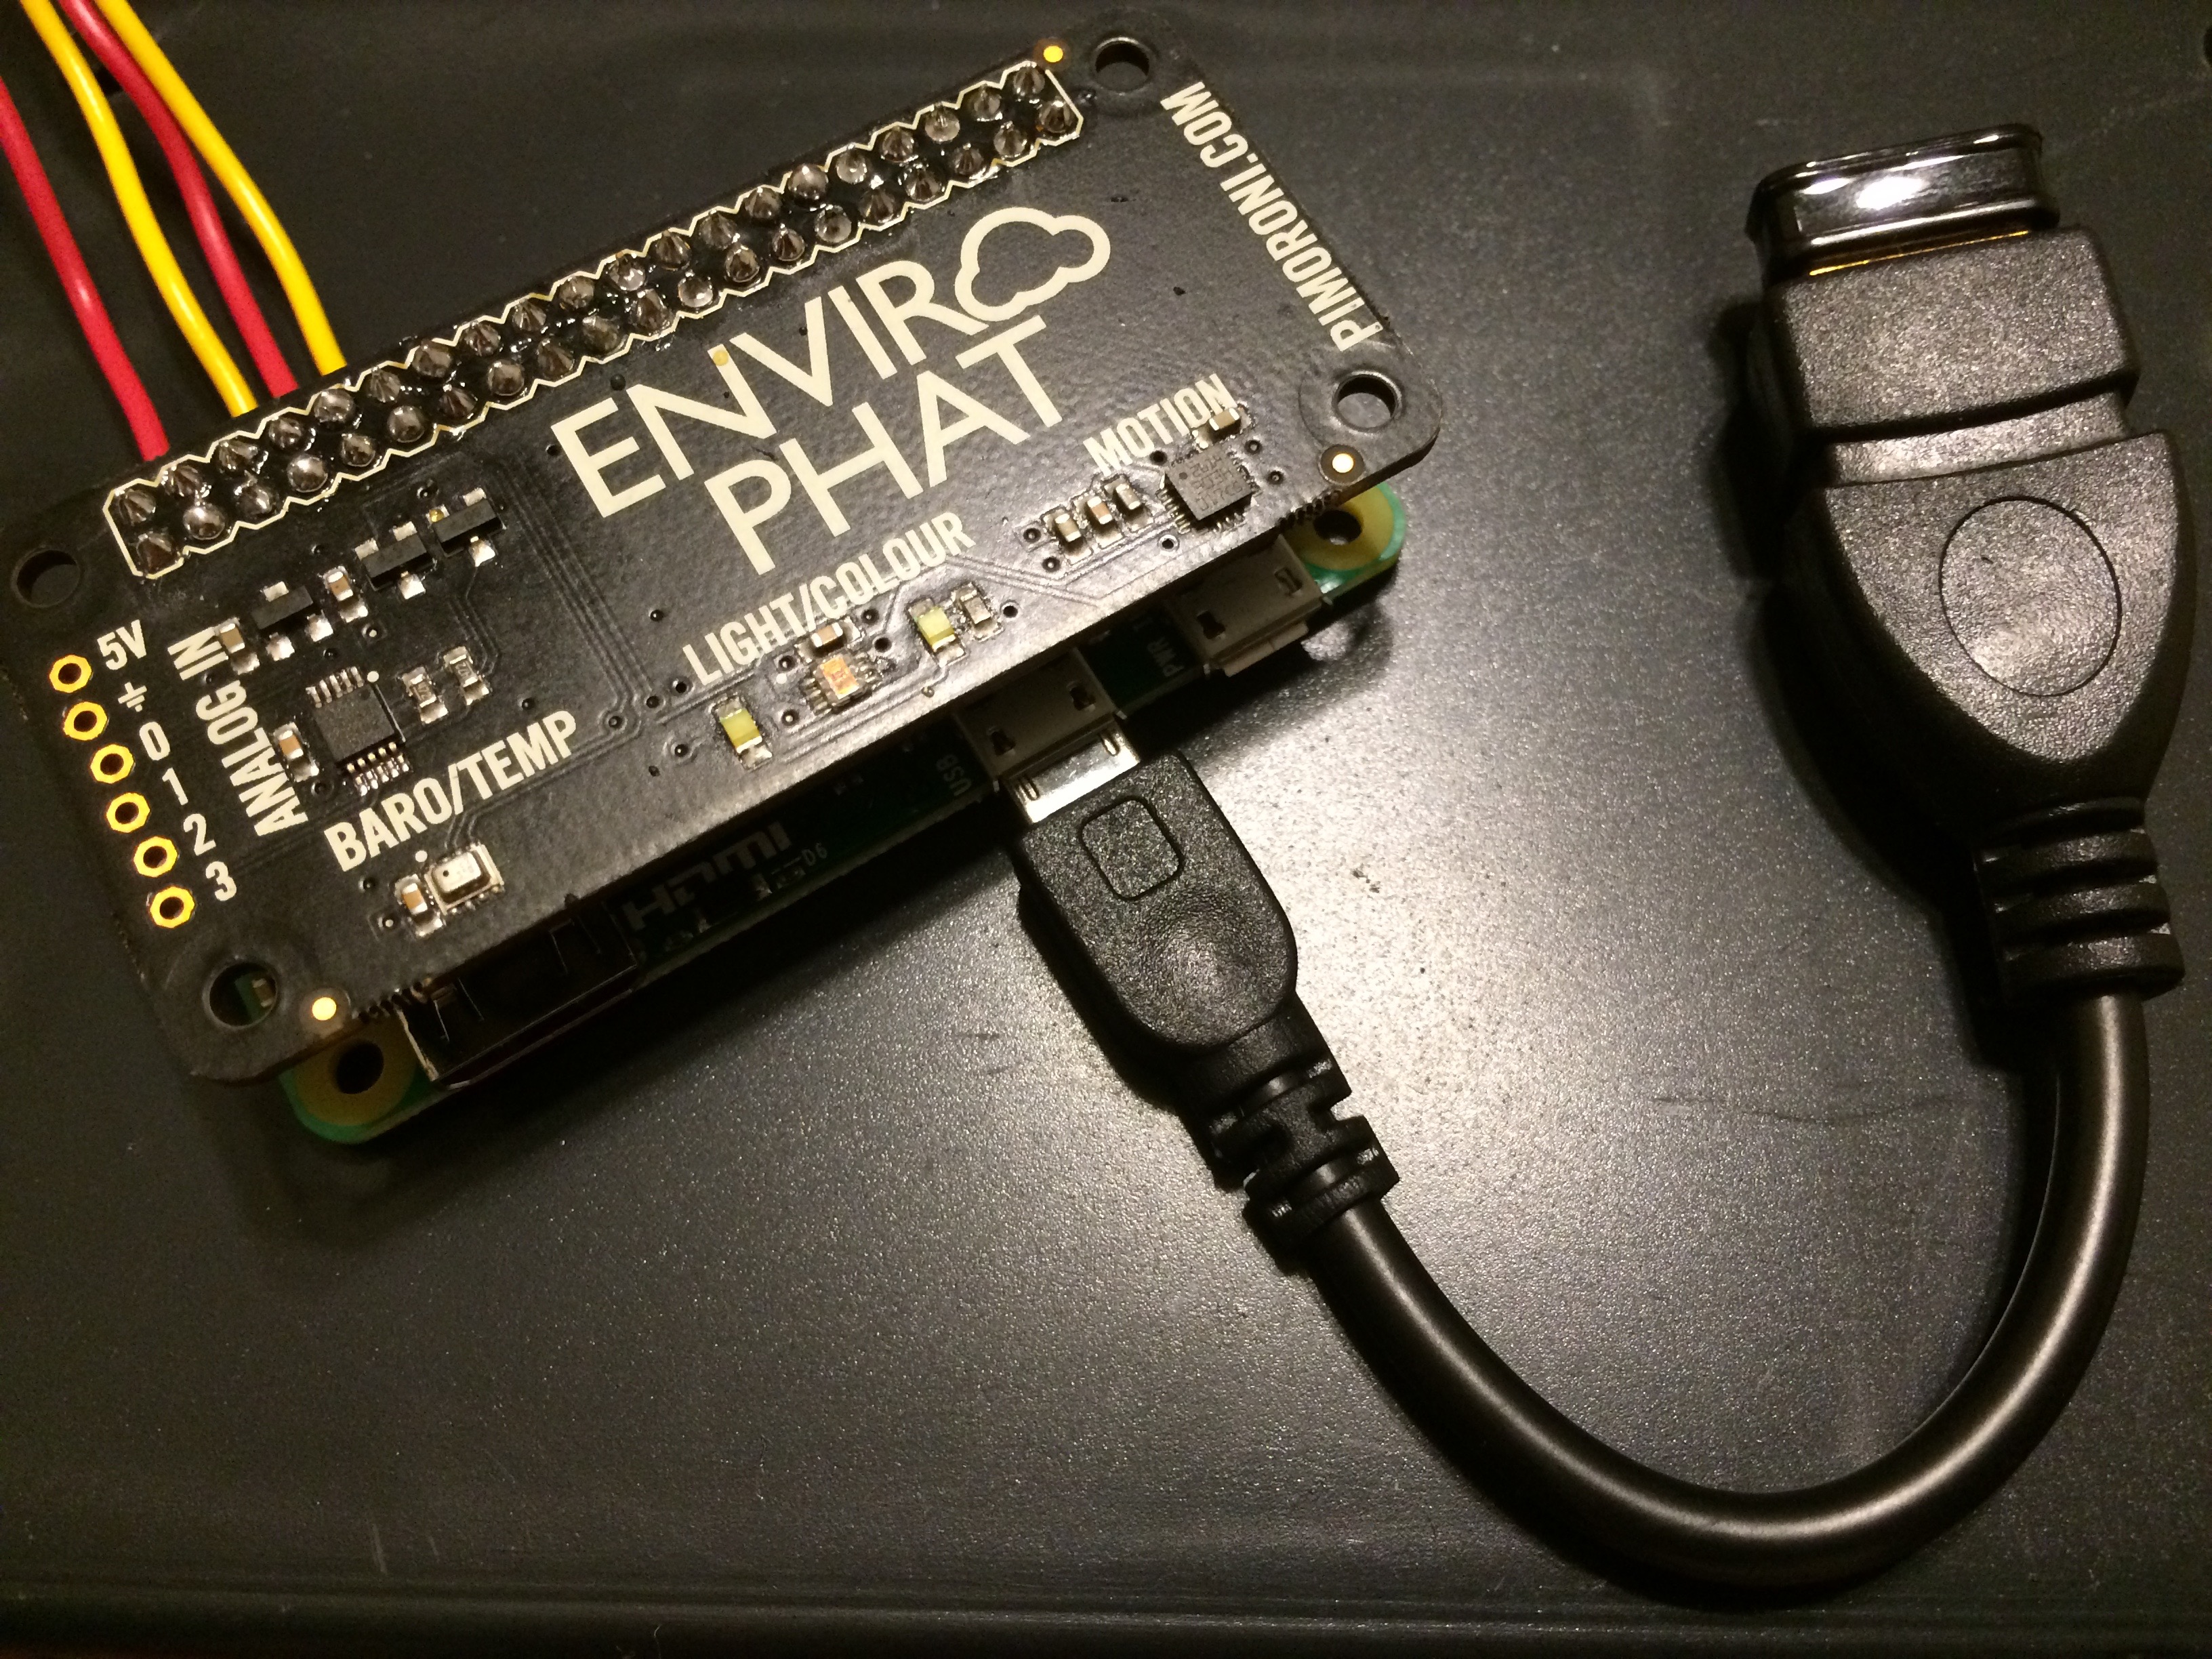
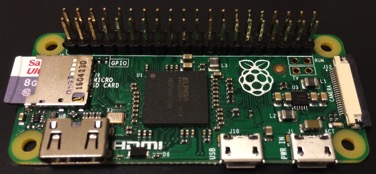
The first steps are soldering on the GPIO pin headers and copying the latest Rasperian distro of Linux (Jessie as of this writing) onto an 8GB microSD card; there are a million websites describing these (Google them!). The 40x2 header pin block comes unattached to the Pi, in case you wish a different config, but it's easy and forgiving to solder because its holes are far enough away from on-board heat-damageable components. Do make sure the microSD card is removed from the board when soldering. All the same is true for the EnviroPHAT too - but notice in the pictures that this one's soldering is done on the top as the header block is on the bottom to attach to the R-Pi's pins.

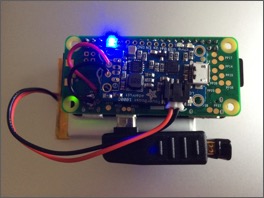
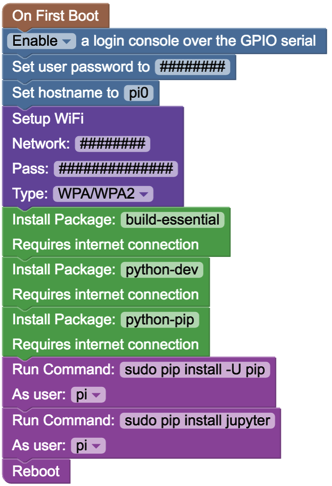
Part a : serial connection. First let's just focus on the R-Pi, leaving the EnviroPHAT aside for a moment. As suggested above, you can Google up many how-to-solder-and-set-up-R-Pi websites, but an important note on them is that here we will focus entirely on the command-line-only version (Jessie Lite as of this writing), and we skip the HDMI, keyboard, mouse, and even standard USB power connection. The 4 serial wires provide power as well as a serial connection. The USB serial cable's wires are colored-coded for the particular pins they're meant for, as seen below. When things go perfectly, the ideal is that your new config on the microSD card including wifi login lets you simply SSH into the device the first time, no serial connection needed. But myself I find that things never go perfectly the first time, and the serial connection is an easy yet minimalist direct access into the device. You'll see below that after everything else is working I remove the serial wires, attach a battery, and do SSH in remotely, but one thing at a time.

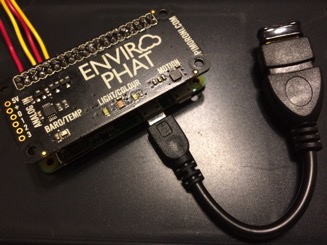
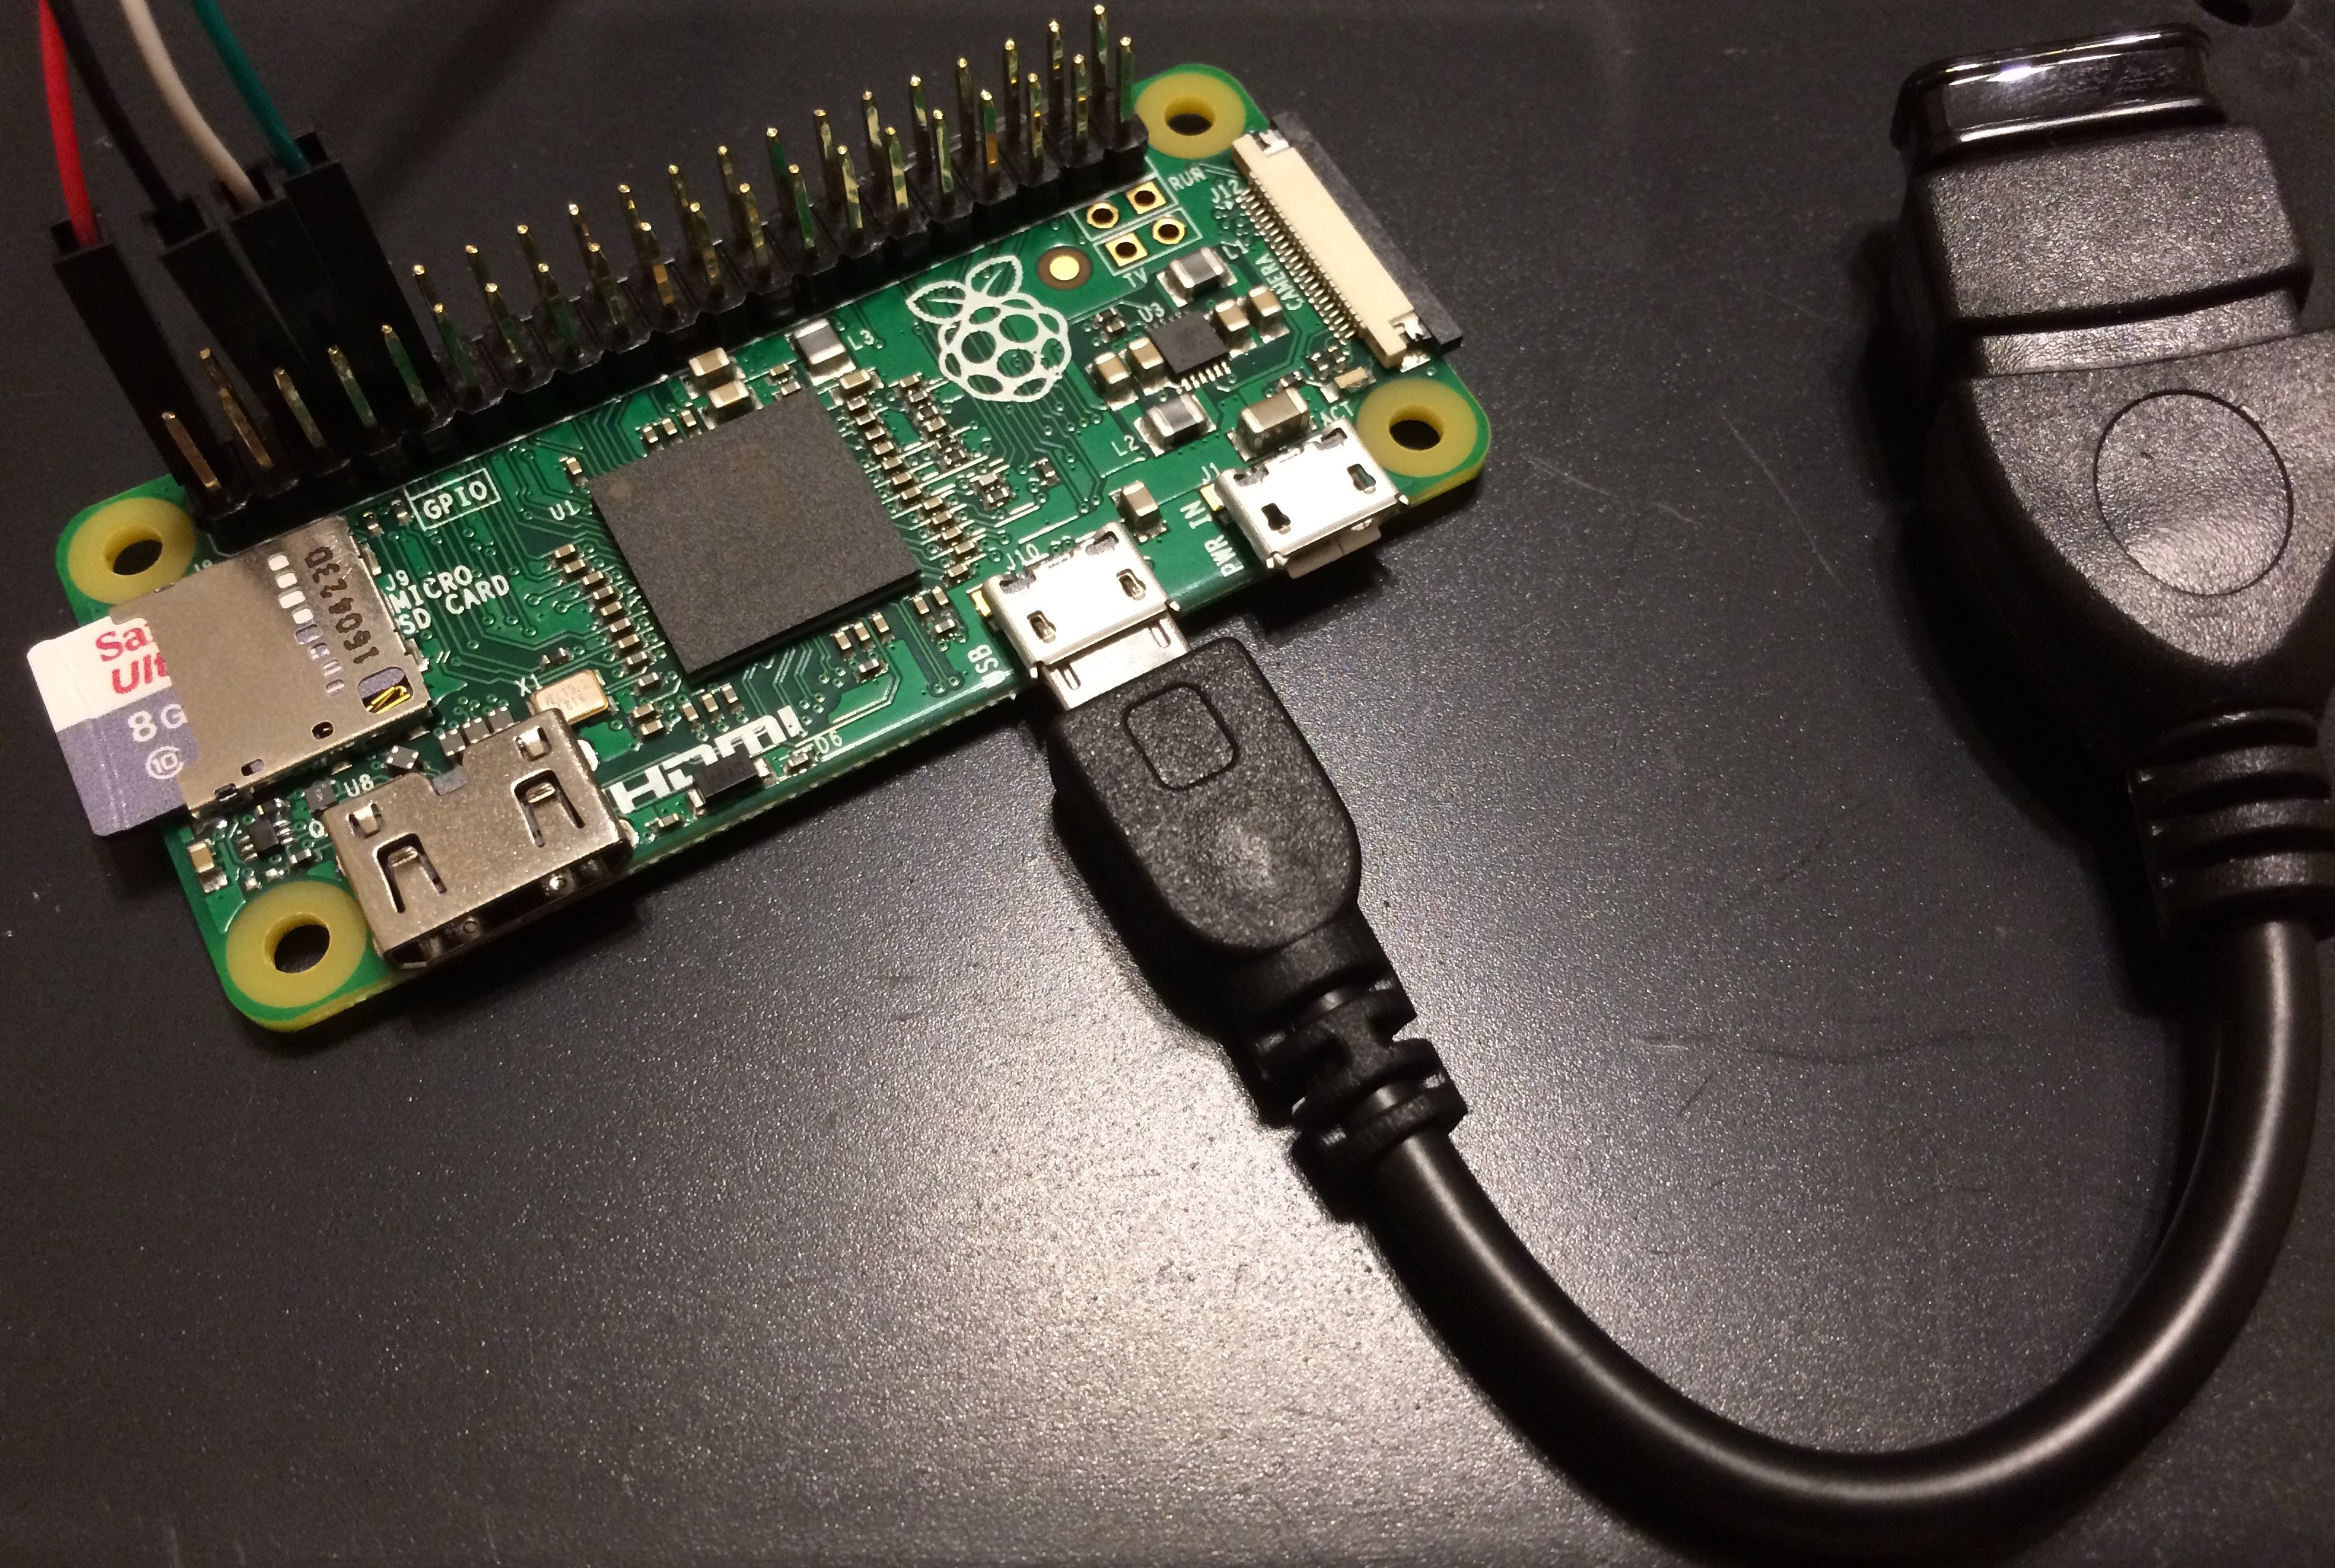
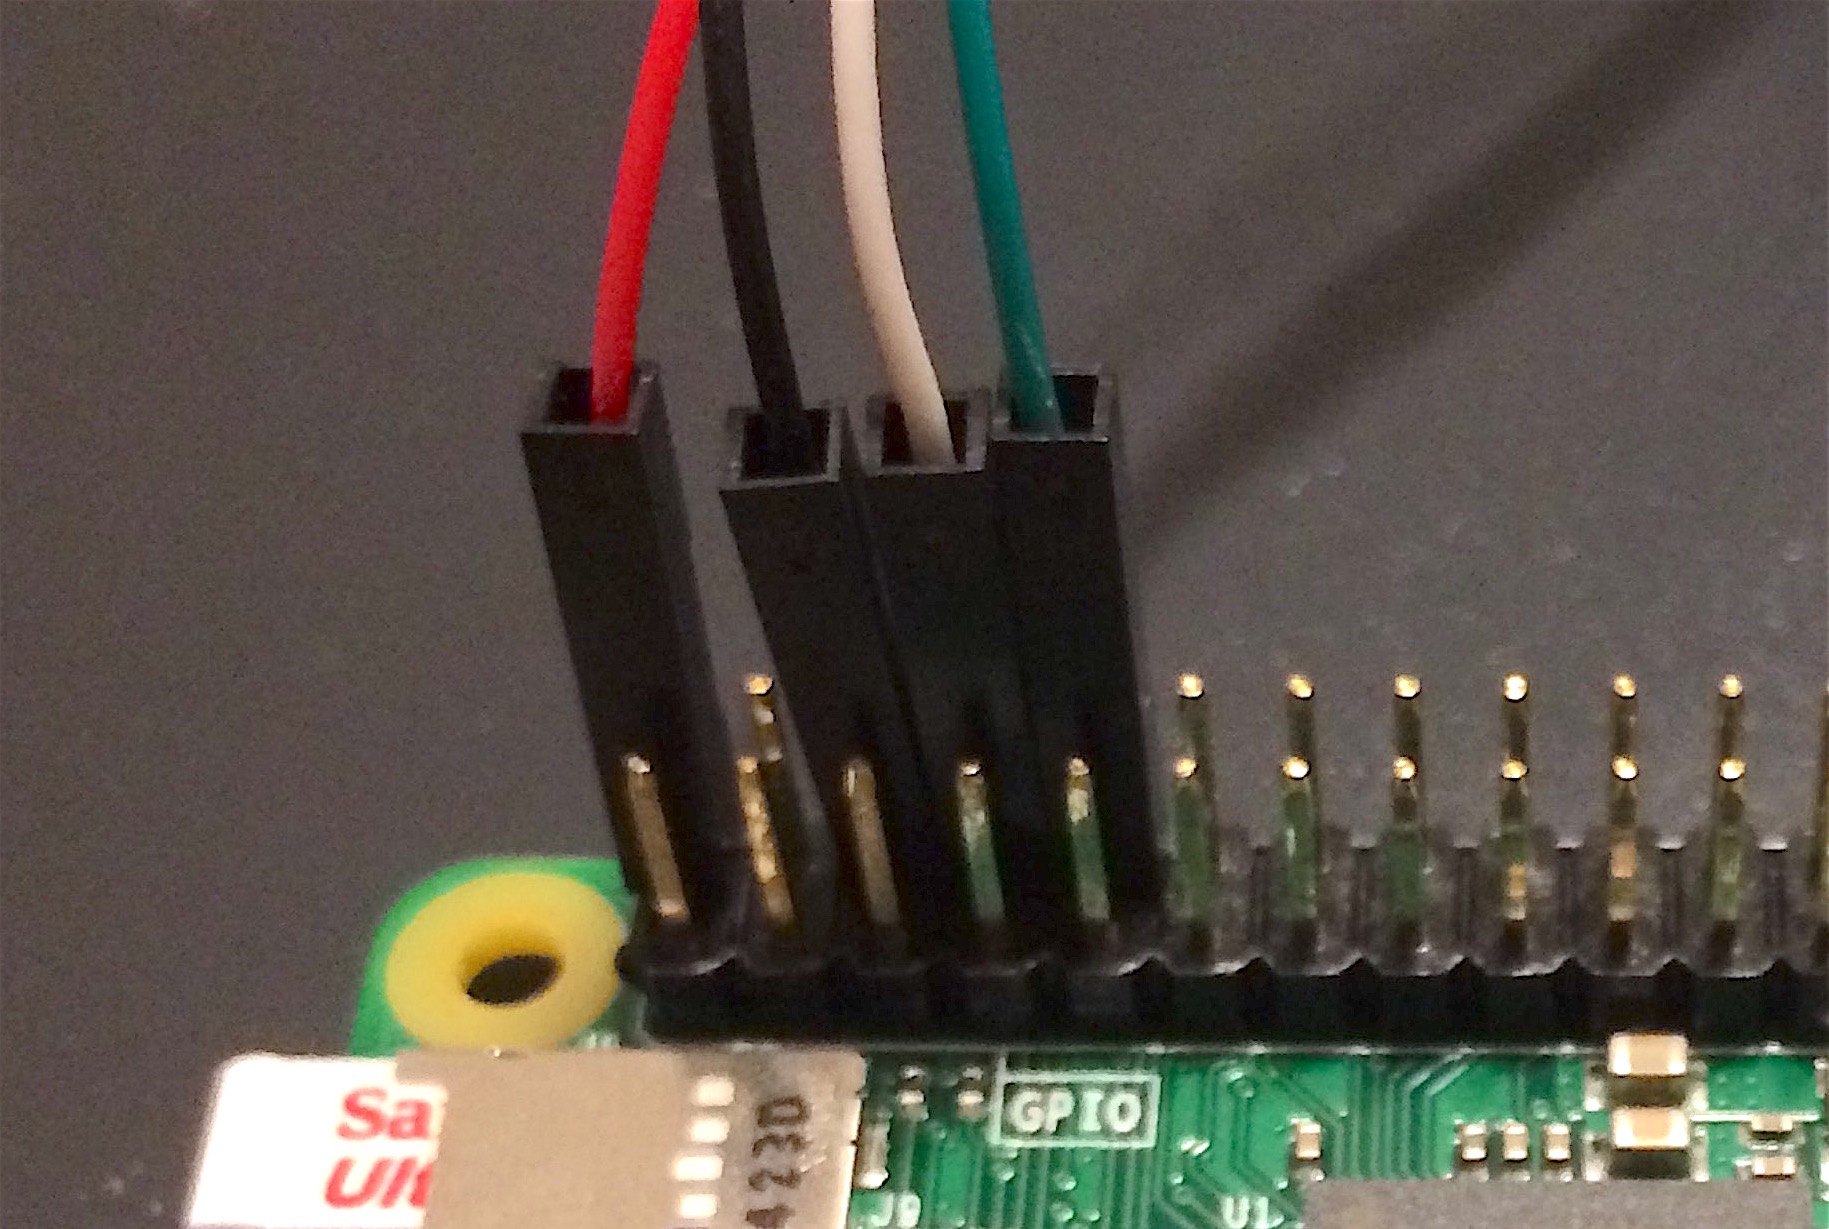
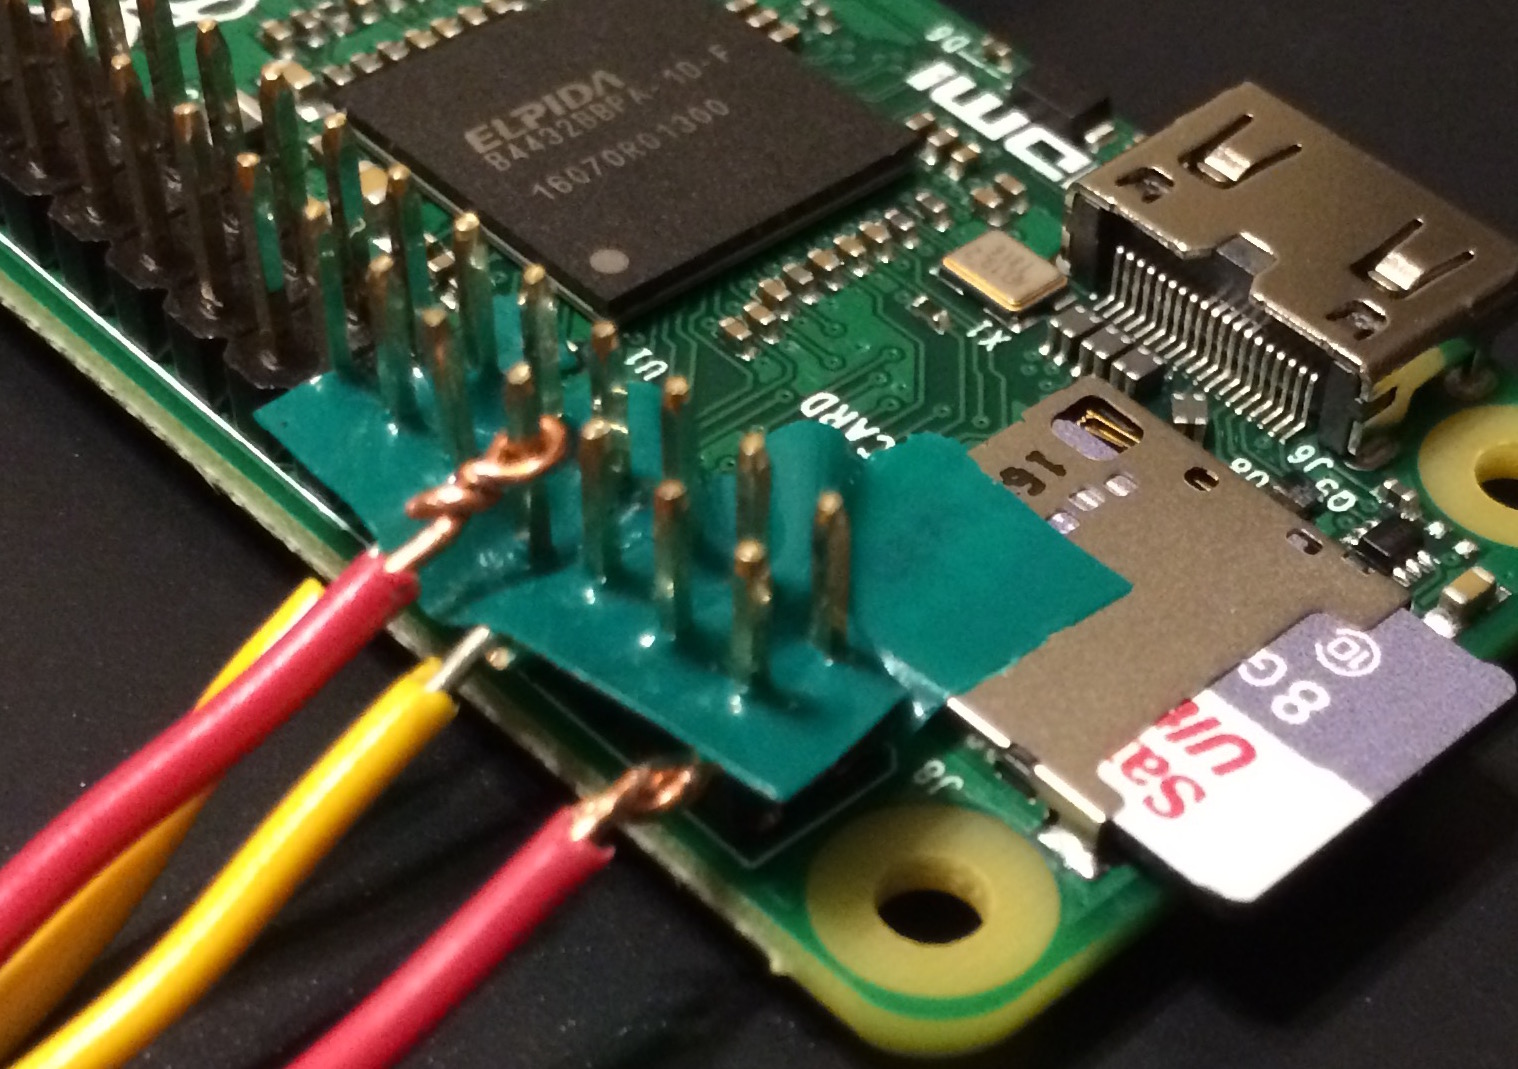
These first images show how/where I attached the USB wifi dongle and serial wires (the instructions come with the serial cable too). Red wire supplies the power (+5V), black is ground, white is serial XMIT, green is serial RCV. That skipped pin is another +5V pin. With these 4 serial wires attached, and the little wifi plug on the end of the USB dongle plugged in as in the picture, the unit is all ready for the PiFactory/system test described in part (a) of the next section. Remember the power comes via the red wire of the serial connection. No USB power necessary (in fact be sure to not do both at same time). I recommend trying out this much before attaching the rest of the hardware.


Part b : serial + EnviroPHAT. You may or may not wish to do this part and instead simply pop on the EnviroPHAT. In that ideal case, in part (a) one gets the wifi-based login working fine, and then attaches either AC adapter or battery to the USB power input, and does away with the serial connection. But for more experimentation, or perhaps to avoid the extra cost of AC adapter or the battery and charger/adapter unit, here's how I connected the serial wires at same time as the EnviroPHAT header.

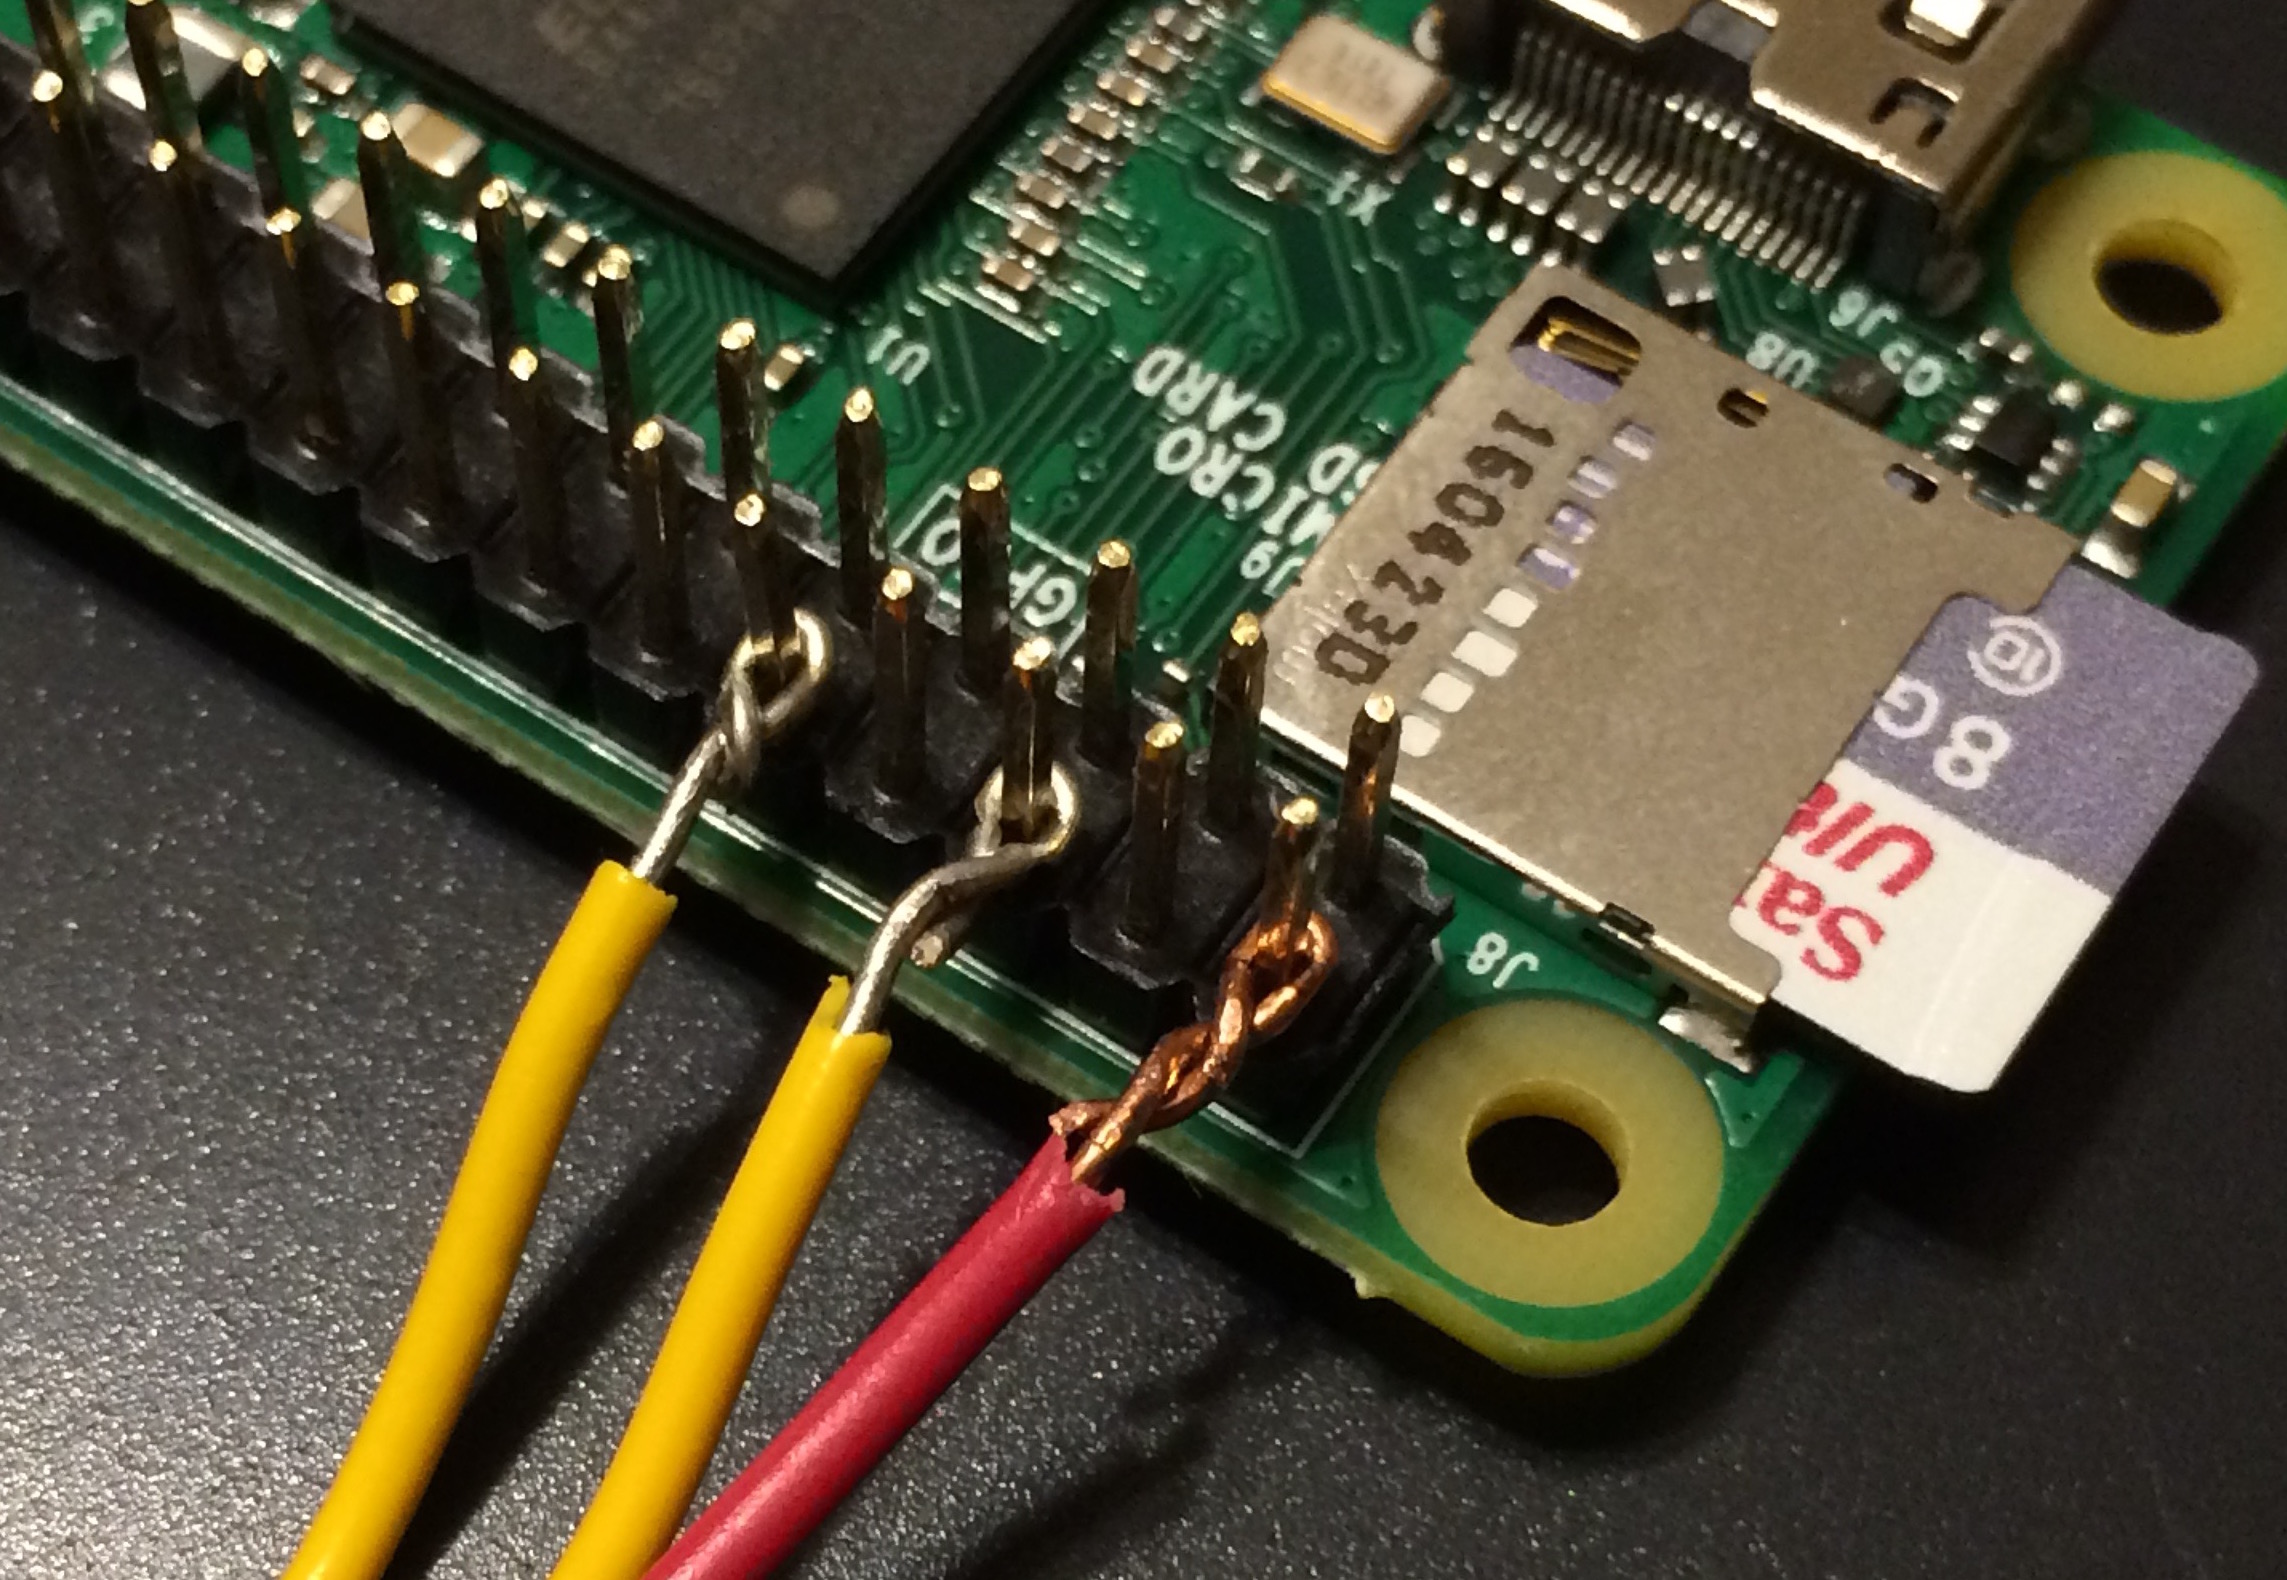
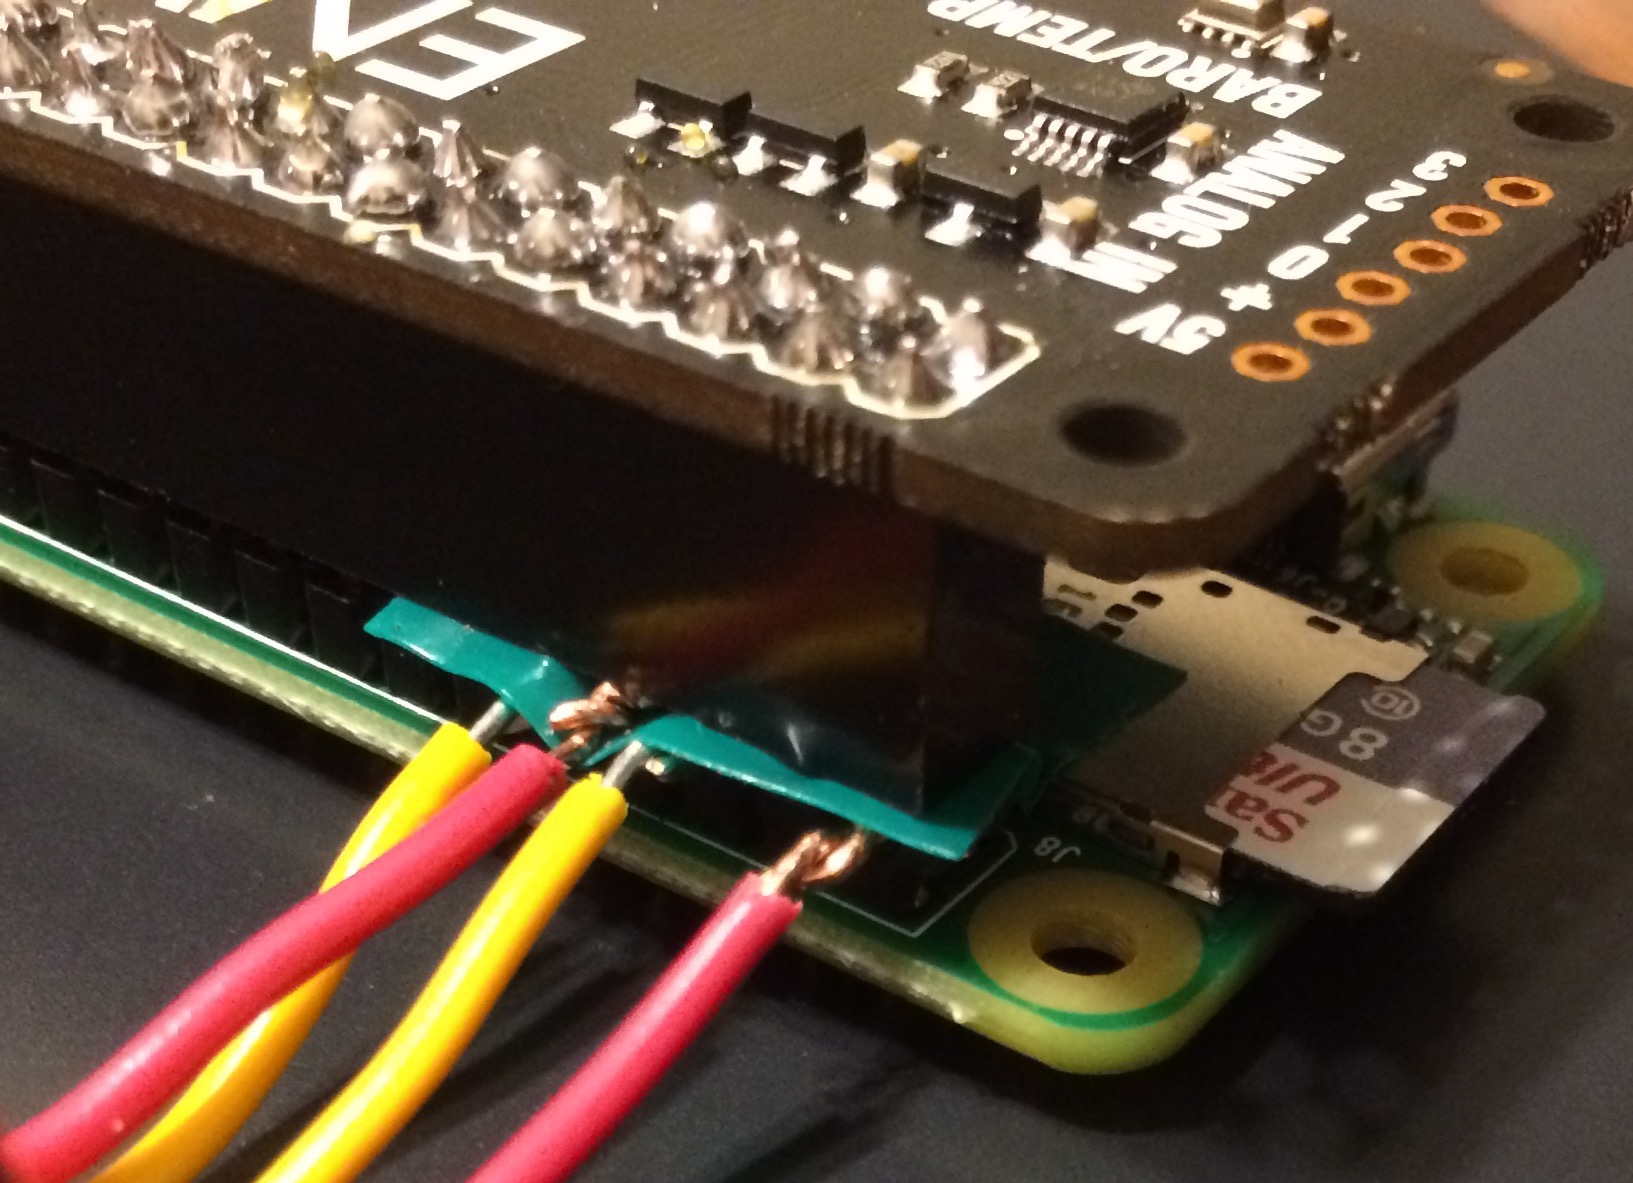
The key to connecting serial wires and EnviroPHAT at same time is that they don't use the same GPIO pins -- if they did they would interfere with each other and possibly blow out a component somewhere too. We can check via the EnviroPHAT's GPIO usage on its pinout.xyz page and see that EnviroPHAT doesn't use GPIO pins 2, 8, and 10 (or ground pin 6 which is just ground), which are the ones the serial wires are connected to. So I looped wires around those pins (with a tape separator for loops on neighboring pins so they don't touch), and these are held in place by the EnviroPHAT's header block. The white, black, red, and green serial cable leads connect to the wires leading to their pins - alas I didn't have black, white, red, and green wire handy during this quickie project so I just used red and yellow.

In this setup, we have the EnviroPHAT attached to the R-Pi, as well as the 4 serial cable wires (which include power), as well as the wifi USB dongle. Again you may wish to skip this step of attaching serial wires and EnviroPHAT at same time, and just rely on battery and wifi login after experimenting in part (a).

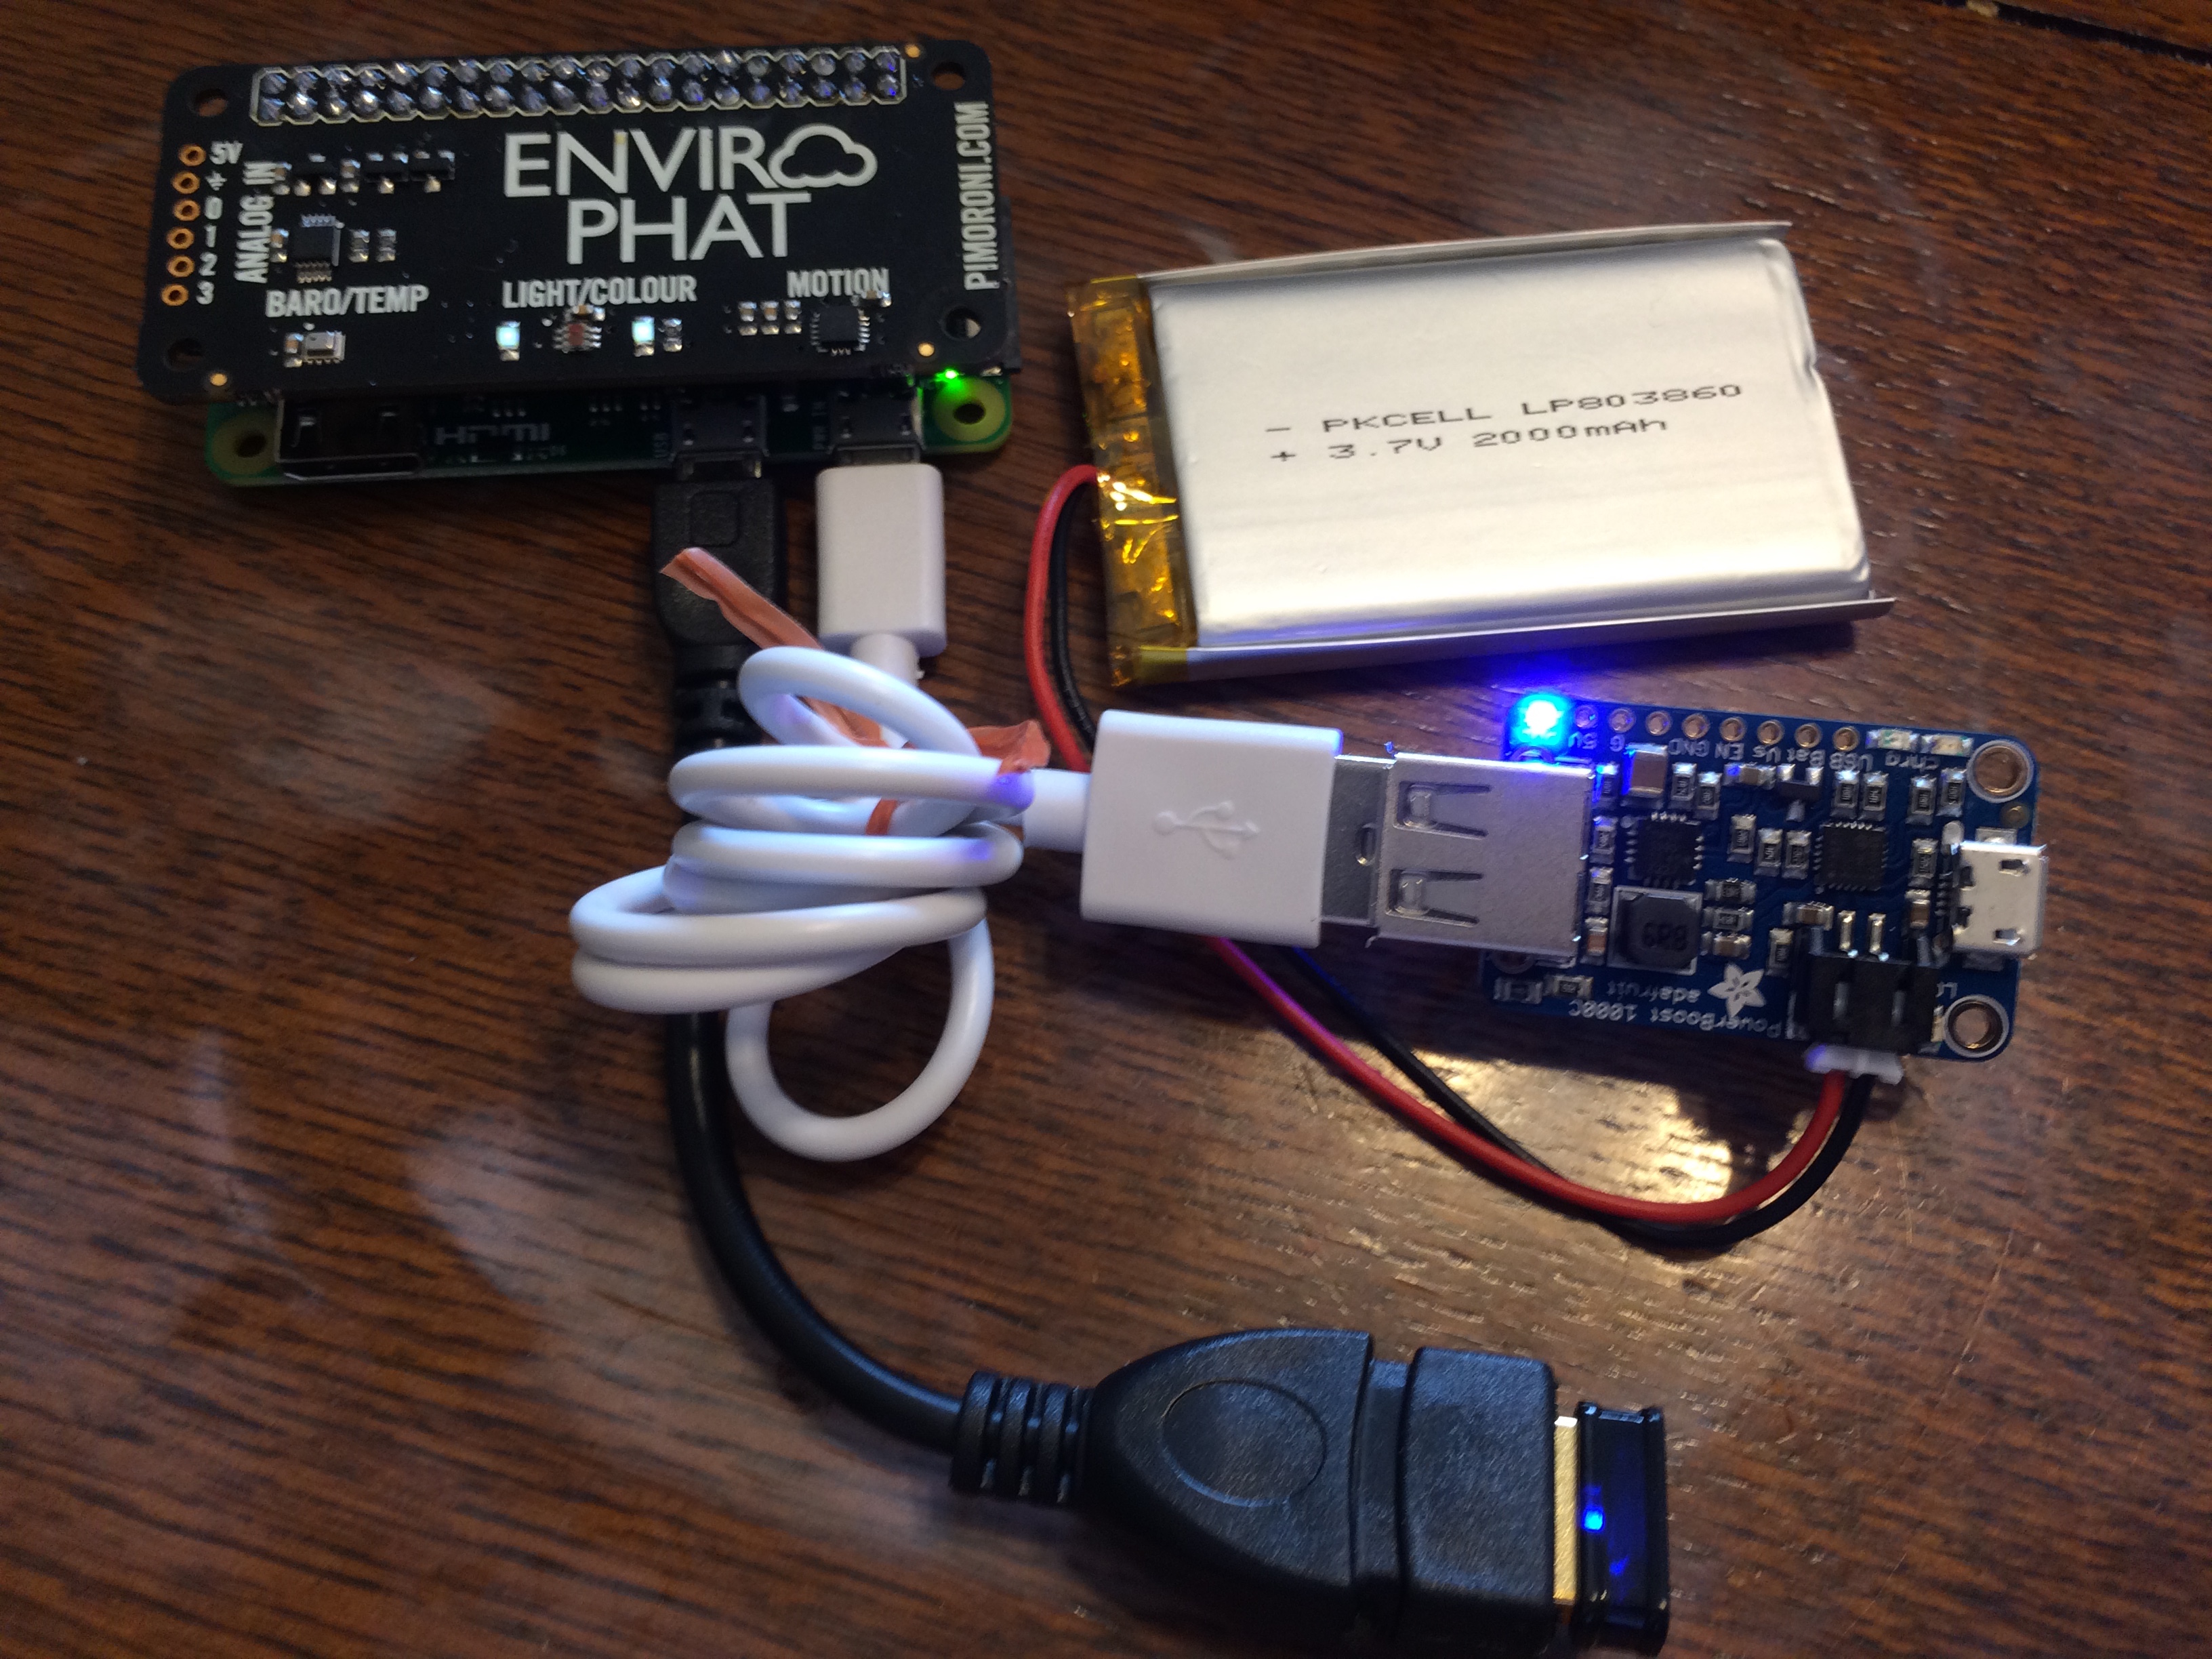
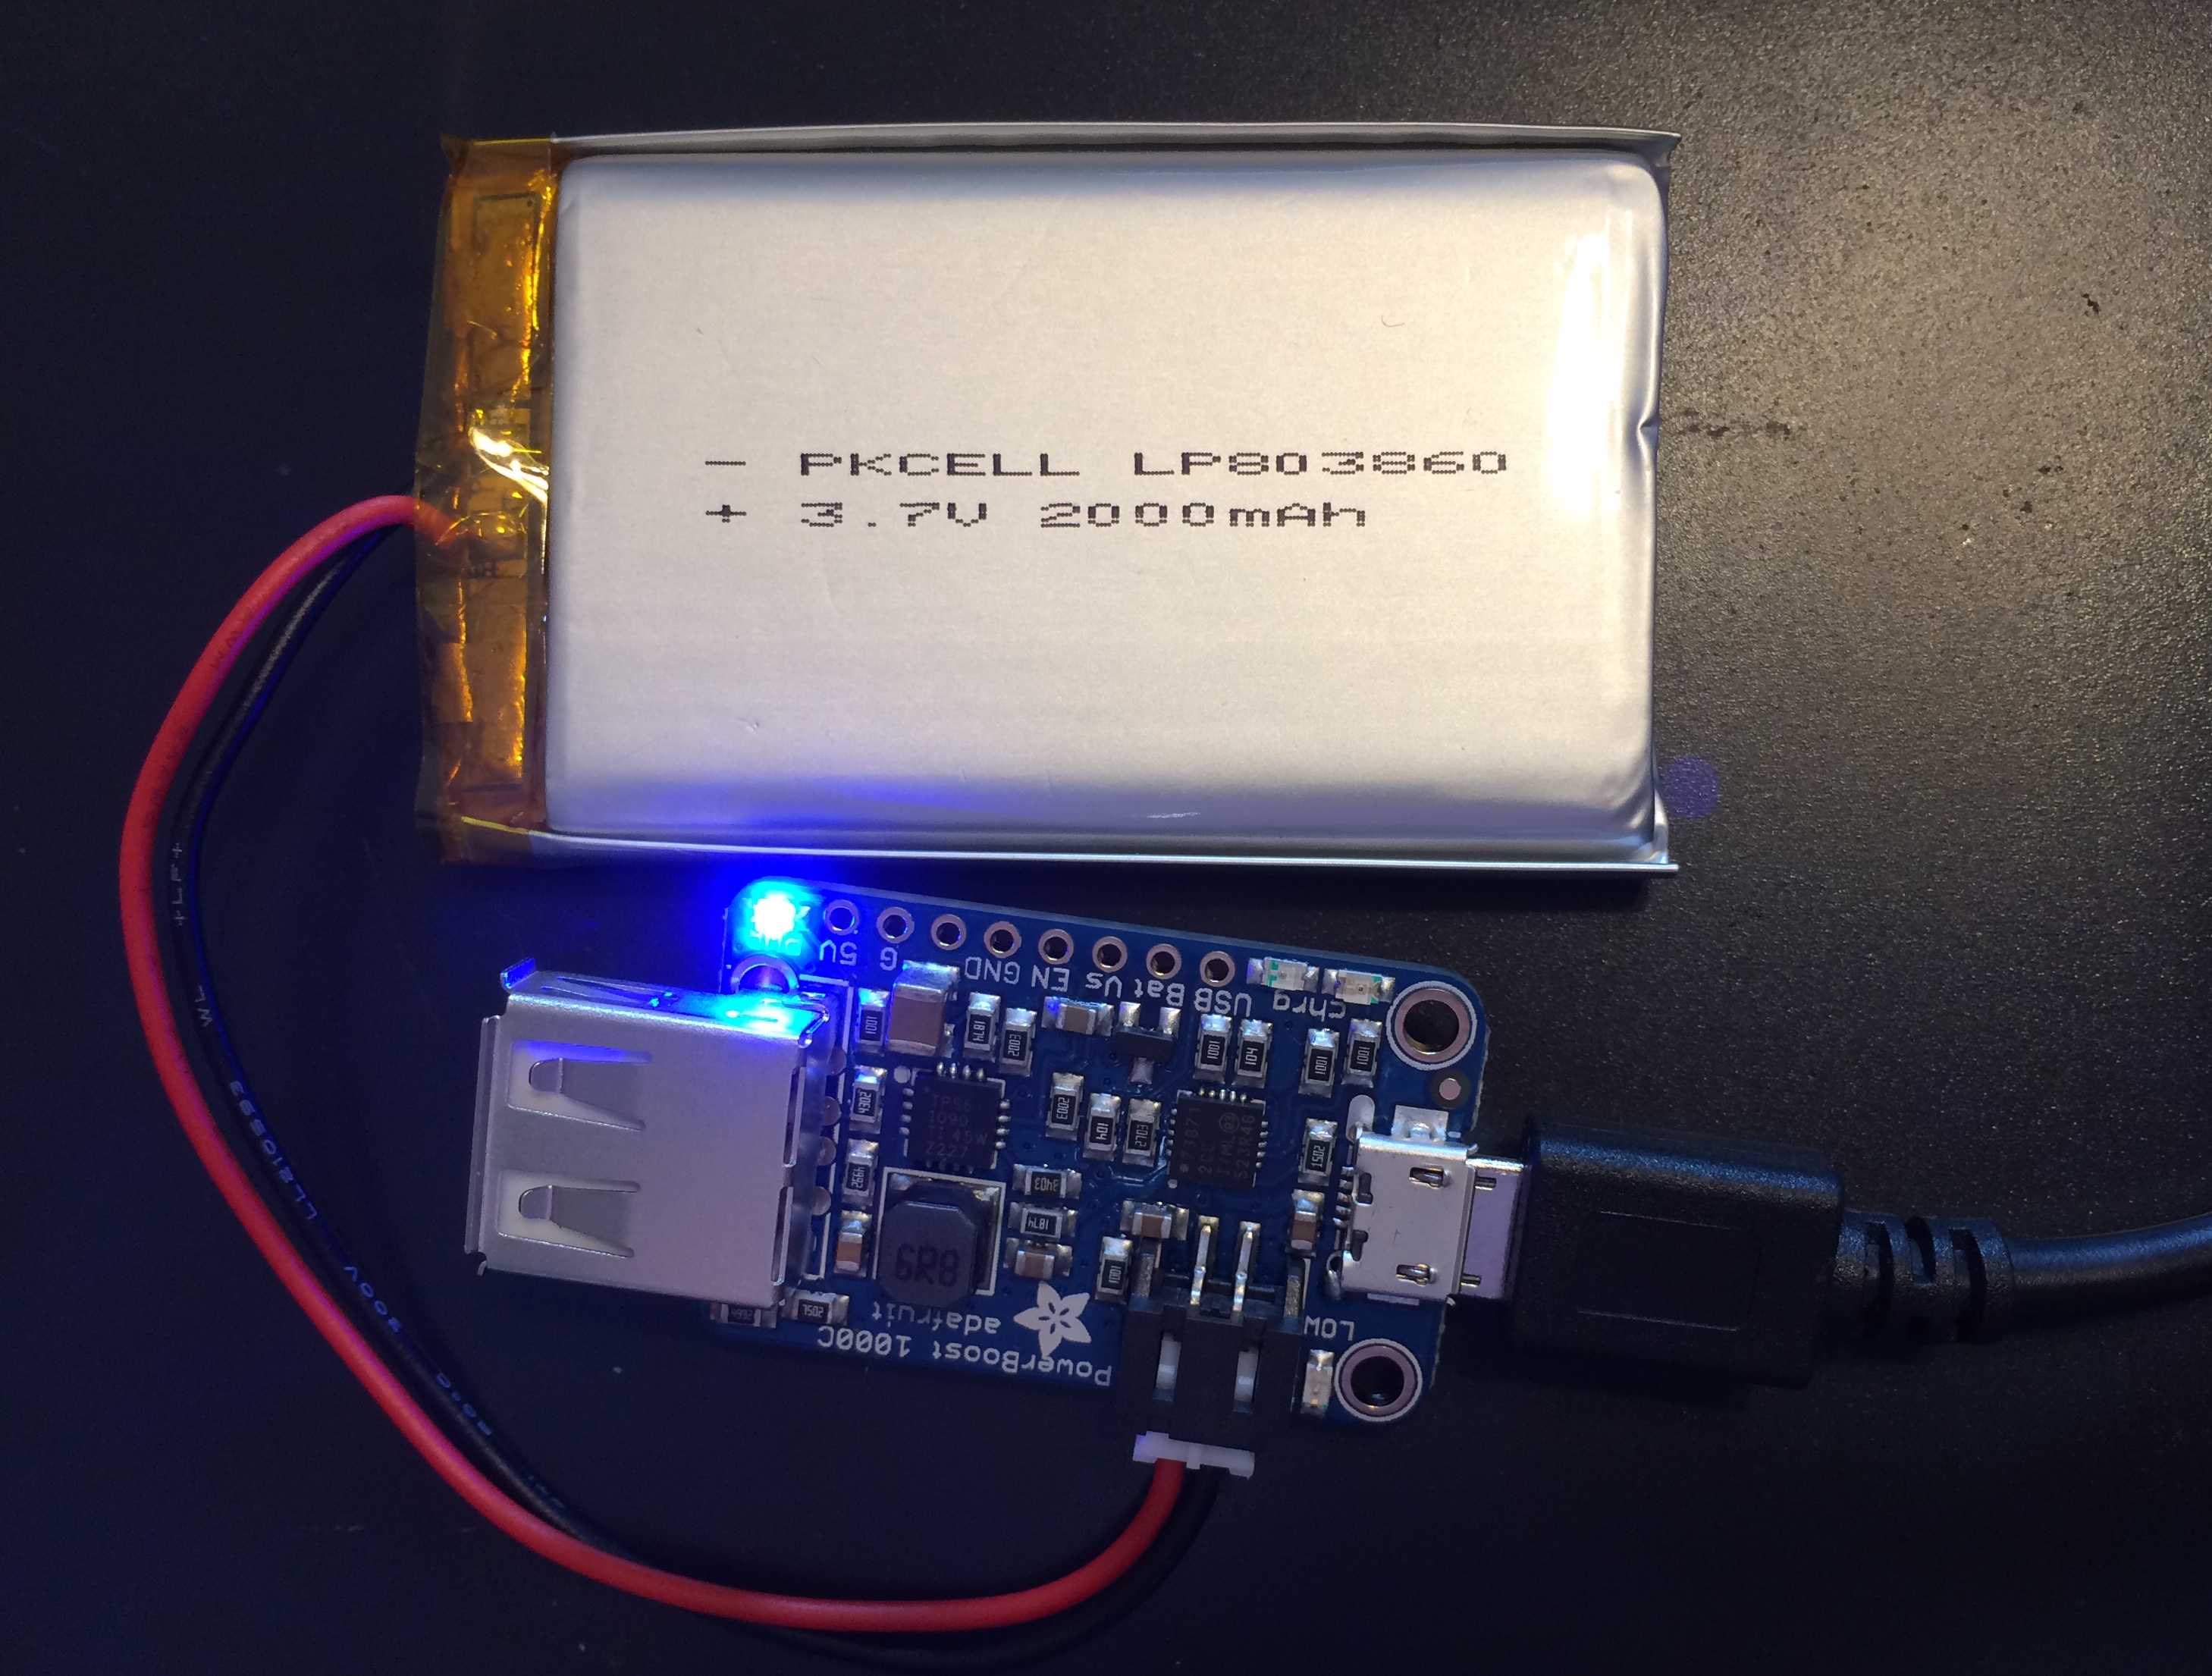
Part c : RPi + EnviroPHAT running on battery. Here's how I hooked up the battery, using the Powerboost 1000C. So far I've just used the white USB cable (coiled up there) to connect to the R-Pi's USB power input. But one can leave the full-size USB socket off the Powerboost, solder a pair of power wires from the Powerboost output directly onto the R-Pi's USB power input (the R-Pi actually has a pair of pads on the board for this), and mount the Powerboost underneath the R-Pi. In any case, what's really nice with the Powerboost 1000C is that you can charge the battery while still supplying power. So while the two pictures below show two separate configs of running-on-battery and recharging-the-battery-from-AC-adapter, really they can be done at the same time. Note that blue light on the Powerboost turns red when you reach low battery. When charging it was yellow until charged up when it was blue again. This webpage shows a nice setup for a Powerboost mounted under the R-Pi to run a low-battery line to a GPIO pin for software alert but I haven't tried it myself yet.


Update: Here's what it looked like when I later added on the Powerboost mounted_powerboostto the underside of the Rpi, and traded out the floppy wifi dongle for a smaller right-angle adapter; makes for a pretty compact unit. The Powerboost power output is connected to the USB power input pins on the back of the Rpi, and is sourced from that same flat LiPo battery, which is approximately the same size as the Rpi + wifi piece. A wad of Sticky Tack (adhesive putty) holds the Powerboost onto the back of the Rpi. However, I've found that while this setup works great for powering the Rpi/etc from battery, the Powerboost can get pretty warm when charging (perhaps not helped by the wad of Sticky Tack), warm enough that for future projects I will not put a Powerboost on back but just the basic LiPo battery adapter and do battery charging separately from the Rpi unit.


PiFactory and serial cable use

While you can do it manually via editors and the command line, I found I really like the tool PiFactory with a Scratch-like GUI (via the Blockly library) to config an R-Pi for things like user password, console enabling, wifi settings, and so on. Note it's a bit of a download because you're downloading the whole Raspbian distro with it, but on each run it takes that basic distro, makes the changes you specify graphically, and then you can write that to your microSD card. The colorful blocks you fill in are translated into lines of a shell script /boot/PiBakery/firstBoot.sh, and this runs and makes the appropriate changes on boot.


For these figures I've entered #### characters for the passwords and stuff I don't want to show you, but in real-life you enter the relevant passwords and such.
Also note that in the dialog I choose "Raspbian Lite" - the command-line-only version - for this project. It takes mine about 4min to write to the microSD.

You probably should try this brief, preliminary version of the script/sequence first, which just sets up the wifi networking and a few other settings on the R-Pi. Again in the ideal you could just make these settings in PiBakery, not worry about using serial wires at all (still need power via AC/battery at USB input or via the red-wire pin though), and SSH in via wifi successfully on the first try. But you may want to experiment with other PiBakery settings or troubleshoot problems, and the serial connection offers an easy way to log in if the wifi isn't working. In any case, let's try this brief preliminary PiBakery script - insert your microSD card into your computer and create this script:

blocklyA

Then click PiBakery's "Write" button to write it to the microSD card, which takes several minutes. Again the "#####" characters are placeholders; I just didn't want to show my passwords and network name here. Note you do need that "enable" line in order to use the serial connection. Lastly, maybe it's a bug, but on looking over the shell script it creates, I noticed that the reboot line appears to get dropped. That means once the system is done booting after a few minutes you may wish to manually reboot (remove/replace the red power wire of the serial connection, or the USB power if using that instead) to get the new hostname propagated. The rest of the settings don't need reboot though, and that hostname won't help you SSH in remotely, so it's not a high priority - maybe this little bug will be fixed soon but it's not a big deal.

At this point there are two ways of accessing your R-Pi system, the serial connection (analogous to logging in on local monitor/keyboard) and SSHing in via wifi.

serial: To access via the serial connection, the serial cable should be connected to the R-Pi on one end and plugged into your computer's USB socket on the other. You've many choices to use for serial terminal depending on what computer and OS you're running. You'll need to Google those if you haven't run them before. I use a Mac, for which I installed the Prolific serial driver as described for example here) and run the command-line screen program to open a connection via:
screen /dev/cu.usbserial 115200
(The driver causes this /dev/cu.usbserial device to appear automatically when the serial cable is plugged into the USB slot.)
Depending how soon you do that after connecting the red power wire to your R-Pi, you see either the boot sequence or your login prompt waiting for you. (To end the screen program you can enter ^a^\. I know it's a little weird but screen is one of those cryptic yet extremely powerful programs like vim or emacs that's worth getting familiar with).
This login access is independent of the networking, and does not use the wifi - it's a direct line into your machine; it's the equivalent of logging in via onboard keyboard and screen.

wifi: To access via wifi, you'll need to know what IP address your R-Pi ended up on after boot. You can find that out via the ifconfig command if you are logged into the R-Pi via the serial connection, or perhaps your wifi router has a web interface on which you can see the new IP address appear when the R-Pi boots. Eg on my home's wifi network the thing is assigned to 10.0.1.9. In that example, you can enter ssh pi@10.0.1.9. In fact alternately you could also enter the following into your ~/.ssh/config file (which you may need to create) so you don't have to type the details each time:

Host pi0
HostName 10.0.1.9
User pi
Port 22
LocalForward 8888 127.0.0.1:8888
Again note your own network may not assign 10.0.1.9, you'll need to check. In any case with this config, you can SSH into your R-Pi by simply doing:

ssh pi0
Additionally, the last line with the LocalForward will be useful below when connecting to the Jupyter ipython notebook server on the R-Pi.

At this point you should be all set for connecting to your R-Pi via serial connection and/or wifi connection, having configured it for these things via the PiBakery. It's worth getting that all working and tested before connecting the EnviroPHAT and continuing on with setting that up below.


Rest of full setup for EnviroPHAT use

Now let's expand that PiBakery setup script to fully prep the R-Pi's system for the EnviroPHAT use. Add the extra software-installation lines into the PiBakery script as below:

blocklyB

After you transfer the microSD card to the R-Pi and boot this sequence will take a while to download and install. The download time will depend on your own internet connection, and then the R-Pi isn't exactly a supercomputer - in my case this install sequence took approximately 35 minutes to complete after the R-Pi's boot. But you can follow the install progress as soon as the R-Pi's login is available (about 1 min after boot). Once logged in to the R-Pi you can do:
tail -f /boot/PiBakery/firstBoot.log
which continually outputs the ongoing contents of the PiBakery script's progress; you can ^C to cut out of that. You can also see the processes running live via (which outputs a tree-formatted process list):
ps -aHfw

After this sequence is finished (as verified by the logfile and/or the process listing), reboot the R-Pi since as above there appears to be a PiBakery bug that leaves out the reboot line.

Once all rebooted, now you can login again, and you're all ready to install the EnviroPHAT software library (per their instructions, which are just this line):
curl -sS https://get.pimoroni.com/envirophat | bash
Unlike the above automated install script, note this one is more user interactive and has several y/n questions to answer. Overall it took about 5 minutes to run on my system, but it will again depend on the speed of your internet connection for downloading components.

With all the above complete and installed, you are finally now ready to start playing with the EnviroPHAT's sensors in a Jupyter notebook running in a server on the R-Pi.


Jupyter notebook lowdown

Here's where that final LocalForward line in the ~/.ssh/config file above comes into play. It allows you to access the Jupyter notebook web service through a secure SSH tunnel into your R-Pi. So login to your R-Pi via SSH - not via serial connection this time - by doing:
ssh pi0
and once logged in then enter:
sudo jupyter notebook
Here's what my screen output looks like when I do that myself:
pi@pi0:~ $ sudo jupyter notebook
[I 18:55:21.274 NotebookApp] Serving notebooks from local directory: /home/pi
[I 18:55:21.277 NotebookApp] 0 active kernels
[I 18:55:21.280 NotebookApp] The Jupyter Notebook is running at: http://localhost:8888/?token=7b431012cb9b1b25418b0c7aea51a5725197746c7fda1ab3
[I 18:55:21.283 NotebookApp] Use Control-C to stop this server and shut down all kernels (twice to skip confirmation).
[W 18:55:21.290 NotebookApp] No web browser found: could not locate runnable browser.
[C 18:55:21.294 NotebookApp]

Copy/paste this URL into your browser when you connect for the first time,
to login with a token:
http://localhost:8888/?token=7b431012cb9b1b25418b0c7aea51a5725197746c7fda1ab3

I then copy/paste that final http line into my computer's web browser, and the .ssh config file knows that the local 8888 port requested in that URL is to be routed through the ssh tunnel to the remote (R-Pi's) 8888 port. In a moment my web browser shows a new Jupyter window and at top right I choose a new Python 2 notebook session. Then I can start entering the following and see if I get reasonable numbers being output. For example I ran this and then covered the unit on the table with a piece of dark paper, ran again, and saw the first output number (light level in some units) drop way down.

jupyterScreen

With a more involved Jupyter python notebook (here) I recorded the outputs from all the EnviroPHAT sensors as I played with it and walked it around the room as so on, and then plotted them to see their response change with time. I've manually annotated the plots for display here - note the sampling rate for this run was 1Hz (as specified in the notebook).
rpi_env_data
This above plots show the effects on the light sensors of my playing with different objects in front of them, but clearly some calibration will be needed for the color sensor - that only seemed to register the light level reduction when I placed pens of various colors in front of the sensor. The accelerometer registered my walking around the room and distinguished it from the unit sitting undisturbed on the table, but I admittedly paid little attention to what random motions I was doing with the unit during the motion stage, and the accelerometer output due to that motion of course will depend on the frequency response of the sensor as well. Finally, my breath test for temperature check caused interesting results - the temperature itself raised and lowered as expected (again I did nothing there to check temperature calibration), but this heating test appears to've had quite an effect on the pressure sensor. Light sensor responses during that stage might have been due to my head shadowing the unit when blowing on it.

Lastly I reran the data acquisition to play with the accelerometer a bit more, shaking the unit in each of three roughly-orthogonal directions at roughly 1Hz period.
rpi_env_data2

I first shook the device vertically up and down about 5-6 times, then left/right about 5-6 times, then fwd/back 5-6 times. We can see the three directions reasonably well in the data, given the caveat that I had no idea which directions were the device's unit directions and wasn't being very careful. For this run I increased the sampling rate to 10Hz to catch my roughly 1Hz shaking period.


Conclusion

Obviously this was all a quick and dirty fun project, but shows the essentials that will get you up and running with accessing your sensor-connected R-Pi remotely via a Jupyter python interface to acquire and optionally plot the sensor data. I was really happy with how easy and quick it was to get the unit working, both at a hardware and a software level. I was amazed that I could run a whole iPython service on the little thing and access it remotely while it was moving around the room! In practice one wouldn't generally run all that onboard the battery-operated sensor unit as it surely wastes plenty of precious battery resources. But easy enough to picture an acquisition mode (say via python scripts without notebook server, and wifi turned off) and a transfer or explore mode (with the wifi and notebook server turned on upon return of the unit to the bench).

When running the notebook above acquiring and plotting the data, my unit was running on that 2000mAhr battery. I didn't fully charge it before noting that it lasted on the order of 7-8hrs of cumulative fairly heavy use (i.e. I'd boot, run a bunch of acquisition and plotting, and then turn it off, and then do so again later, summing the times). I see a few webpages with interesting explorations regarding power usage of R-Pi's, and reducing it by turning off unnecessary software and hardware services (here and here). Happy remote sensing!


Links

Stores:
Adafruit
Pimoroni
Canakit
The Pi Hut

EnviroPHAT:
https://github.com/pimoroni/enviro-phat
https://learn.pimoroni.com/tutorial/sandyj/getting-started-with-enviro-phat
http://docs.pimoroni.com/envirophat/#
https://www.raspberrypi.org/forums/viewtopic.php?t=130450&p=870964

Pinouts:
https://pinout.xyz (Raspberry Pi itself)
https://pinout.xyz/pinout/enviro_phat

Software:
PiFactory
Scratch
Blockly
serial drivers for Macs

Connecting battery for R-Pi:
https://github.com/NeonHorizon/lipopi

R-Pi Power:
https://www.jeffgeerling.com/blogs/jeff-geerling/raspberry-pi-zero-conserve-energy
https://www.jeffgeerling.com/blogs/jeff-geerling/raspberry-pi-zero-power